Seller Management UI/UX Design Structure (Step-by-Step Implementation)
Crafting an effective Seller Management UI/UX design structure is essential for creating intuitive, efficient, and user-friendly platforms that empower sellers to manage their operations seamlessly. This step-by-step implementation guide outlines a strategic approach to designing a robust seller management interface, balancing functionality with an exceptional user experience. The process begins with understanding the sellers’ needs—such as inventory tracking, order processing, and analytics—while ensuring the design aligns with business goals. A well-structured UI/UX enhances productivity, reduces friction, and fosters seller satisfaction, ultimately driving platform success. This introduction explores a phased methodology, from research and wireframing to prototyping and testing, tailored to create a scalable and visually appealing system. By prioritizing usability, accessibility, and responsiveness, the design structure aims to simplify complex workflows, provide clear navigation, and deliver actionable insights. Let’s dive into the step-by-step process to build a seller management interface that stands out in today’s competitive digital landscape.
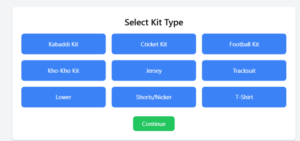
Seller Management UI/UX design Step 1: Select Kit Type
Dropdown or Grid Selection of Kits (Kabaddi Kit, Cricket Kit, Football Kit, Kho-Kho Kit, Jersey, Tracksuit, Lower, Shorts/Nicker, T-Shirt)
User selects the desired kit type
Continue button to proceed to next step
select_Kit_Jersey
<!DOCTYPE html>
<html lang=”en”>
<head>
<meta charset=”UTF-8″>
<meta name=”viewport” content=”width=device-width, initial-scale=1.0″>
<title>Seller Management – Select Kit Type</title>
<script src=”https://cdn.tailwindcss.com”></script>
</head>
<body class=”bg-gray-100 p-6″>
<div class=”max-w-3xl mx-auto bg-white p-6 rounded-lg shadow-md”>
<h2 class=”text-2xl font-semibold text-center mb-4″>Select Kit Type</h2>
<div class=”grid grid-cols-2 md:grid-cols-3 gap-4″>
<button class=”p-4 bg-blue-500 text-white rounded-lg”>Kabaddi Kit</button>
<button class=”p-4 bg-blue-500 text-white rounded-lg”>Cricket Kit</button>
<button class=”p-4 bg-blue-500 text-white rounded-lg”>Football Kit</button>
<button class=”p-4 bg-blue-500 text-white rounded-lg”>Kho-Kho Kit</button>
<button class=”p-4 bg-blue-500 text-white rounded-lg”>Jersey</button>
<button class=”p-4 bg-blue-500 text-white rounded-lg”>Tracksuit</button>
<button class=”p-4 bg-blue-500 text-white rounded-lg”>Lower</button>
<button class=”p-4 bg-blue-500 text-white rounded-lg”>Shorts/Nicker</button>
<button class=”p-4 bg-blue-500 text-white rounded-lg”>T-Shirt</button>
</div>
<div class=”text-center mt-6″>
<button class=”px-6 py-2 bg-green-500 text-white rounded-lg”>Continue</button>
</div>
</div>
</div>
</body>
</html>
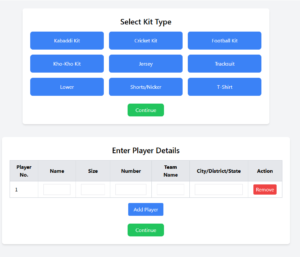
Seller Management UI/UX design Step 2: Enter Player Details
Table Input Form for Player Details: | Player No. | Name | Size | Number | Team Name | City/District/State | |————|——|——|——–|————|——————| | 1 | XYZ | M | 10 | ABC Team | City A | | 2 | ABC | L | 12 | XYZ Team | City B |
Option to add/remove players
Proceed to next step
Step 2: Enter Player Details
<!DOCTYPE html>
<html lang=”en”>
<head>
<meta charset=”UTF-8″>
<meta name=”viewport” content=”width=device-width, initial-scale=1.0″>
<title>Seller Management – Select Kit Type</title>
<script src=”https://cdn.tailwindcss.com”></script>
</head>
<body class=”bg-gray-100 p-6″>
<div class=”max-w-3xl mx-auto bg-white p-6 rounded-lg shadow-md”>
<h2 class=”text-2xl font-semibold text-center mb-4″>Select Kit Type</h2>
<div class=”grid grid-cols-2 md:grid-cols-3 gap-4″>
<button class=”p-4 bg-blue-500 text-white rounded-lg”>Kabaddi Kit</button>
<button class=”p-4 bg-blue-500 text-white rounded-lg”>Cricket Kit</button>
<button class=”p-4 bg-blue-500 text-white rounded-lg”>Football Kit</button>
<button class=”p-4 bg-blue-500 text-white rounded-lg”>Kho-Kho Kit</button>
<button class=”p-4 bg-blue-500 text-white rounded-lg”>Jersey</button>
<button class=”p-4 bg-blue-500 text-white rounded-lg”>Tracksuit</button>
<button class=”p-4 bg-blue-500 text-white rounded-lg”>Lower</button>
<button class=”p-4 bg-blue-500 text-white rounded-lg”>Shorts/Nicker</button>
<button class=”p-4 bg-blue-500 text-white rounded-lg”>T-Shirt</button>
</div>
<div class=”text-center mt-6″>
<button class=”px-6 py-2 bg-green-500 text-white rounded-lg”>Continue</button>
</div>
</div><!– Step 2: Enter Player Details –>
<div class=”max-w-4xl mx-auto bg-white p-6 rounded-lg shadow-md mt-10″>
<h2 class=”text-2xl font-semibold text-center mb-4″>Enter Player Details</h2>
<table class=”w-full border-collapse border border-gray-300″>
<thead>
<tr class=”bg-gray-200″>
<th class=”border border-gray-300 px-4 py-2″>Player No.</th>
<th class=”border border-gray-300 px-4 py-2″>Name</th>
<th class=”border border-gray-300 px-4 py-2″>Size</th>
<th class=”border border-gray-300 px-4 py-2″>Number</th>
<th class=”border border-gray-300 px-4 py-2″>Team Name</th>
<th class=”border border-gray-300 px-4 py-2″>City/District/State</th>
<th class=”border border-gray-300 px-4 py-2″>Action</th>
</tr>
</thead>
<tbody id=”playerTable”>
<tr>
<td class=”border border-gray-300 px-4 py-2″>1</td>
<td class=”border border-gray-300 px-4 py-2″><input type=”text” class=”w-full p-1 border”></td>
<td class=”border border-gray-300 px-4 py-2″><input type=”number” class=”w-full p-1 border”></td>
<td class=”border border-gray-300 px-4 py-2″><input type=”text” class=”w-full p-1 border”></td>
<td class=”border border-gray-300 px-4 py-2 text-center”>
<button class=”px-2 py-1 bg-red-500 text-white rounded”>Remove</button>
</td>
</tr>
</tbody>
</table>
<div class=”text-center mt-4″>
<button class=”px-4 py-2 bg-blue-500 text-white rounded” onclick=”addPlayer()”>Add Player</button>
</div>
<div class=”text-center mt-6″>
<button class=”px-6 py-2 bg-green-500 text-white rounded-lg”>Continue</button>
</div>
</div><script>
function addPlayer() {
let table = document.getElementById(“playerTable”);
let row = table.insertRow();
row.innerHTML = `
<td class=’border border-gray-300 px-4 py-2′>${table.rows.length}</td>
<td class=’border border-gray-300 px-4 py-2′><input type=”text” class=”w-full p-1 border”></td>
<td class=’border border-gray-300 px-4 py-2′><input type=”number” class=”w-full p-1 border”></td>
<td class=’border border-gray-300 px-4 py-2′><input type=”text” class=”w-full p-1 border”></td>
<td class=’border border-gray-300 px-4 py-2 text-center’>
<button class=”px-2 py-1 bg-red-500 text-white rounded” onclick=”removePlayer(this)”>Remove</button>
</td>
`;
}function removePlayer(button) {
let row = button.parentElement.parentElement;
row.parentElement.removeChild(row);
}
</script>
</body>
</html>
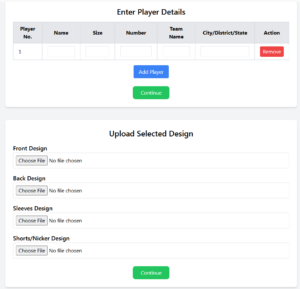
Seller Management UI/UX design Step 3: Upload Selected Design
Upload options for:
Front Design
Back Design
Sleeves Design
Shorts/Nicker Design
Preview of Uploaded Designs
Continue to next step
Upload Design
<!DOCTYPE html>
<html lang=”en”>
<head>
<meta charset=”UTF-8″>
<meta name=”viewport” content=”width=device-width, initial-scale=1.0″>
<title>Seller Management – Upload Design</title>
<script src=”https://cdn.tailwindcss.com”></script>
</head>
<body class=”bg-gray-100 p-6″>
<div class=”max-w-3xl mx-auto bg-white p-6 rounded-lg shadow-md”>
<h2 class=”text-2xl font-semibold text-center mb-4″>Select Kit Type</h2>
<div class=”grid grid-cols-2 md:grid-cols-3 gap-4″>
<button class=”p-4 bg-blue-500 text-white rounded-lg”>Kabaddi Kit</button>
<button class=”p-4 bg-blue-500 text-white rounded-lg”>Cricket Kit</button>
<button class=”p-4 bg-blue-500 text-white rounded-lg”>Football Kit</button>
<button class=”p-4 bg-blue-500 text-white rounded-lg”>Kho-Kho Kit</button>
<button class=”p-4 bg-blue-500 text-white rounded-lg”>Jersey</button>
<button class=”p-4 bg-blue-500 text-white rounded-lg”>Tracksuit</button>
<button class=”p-4 bg-blue-500 text-white rounded-lg”>Lower</button>
<button class=”p-4 bg-blue-500 text-white rounded-lg”>Shorts/Nicker</button>
<button class=”p-4 bg-blue-500 text-white rounded-lg”>T-Shirt</button>
</div>
<div class=”text-center mt-6″>
<button class=”px-6 py-2 bg-green-500 text-white rounded-lg”>Continue</button>
</div>
</div><!– Step 2: Enter Player Details –>
<div class=”max-w-4xl mx-auto bg-white p-6 rounded-lg shadow-md mt-10″>
<h2 class=”text-2xl font-semibold text-center mb-4″>Enter Player Details</h2>
<table class=”w-full border-collapse border border-gray-300″>
<thead>
<tr class=”bg-gray-200″>
<th class=”border border-gray-300 px-4 py-2″>Player No.</th>
<th class=”border border-gray-300 px-4 py-2″>Name</th>
<th class=”border border-gray-300 px-4 py-2″>Size</th>
<th class=”border border-gray-300 px-4 py-2″>Number</th>
<th class=”border border-gray-300 px-4 py-2″>Team Name</th>
<th class=”border border-gray-300 px-4 py-2″>City/District/State</th>
<th class=”border border-gray-300 px-4 py-2″>Action</th>
</tr>
</thead>
<tbody id=”playerTable”>
<tr>
<td class=”border border-gray-300 px-4 py-2″>1</td>
<td class=”border border-gray-300 px-4 py-2″><input type=”text” class=”w-full p-1 border”></td>
<td class=”border border-gray-300 px-4 py-2″><input type=”number” class=”w-full p-1 border”></td>
<td class=”border border-gray-300 px-4 py-2″><input type=”text” class=”w-full p-1 border”></td>
<td class=”border border-gray-300 px-4 py-2 text-center”>
<button class=”px-2 py-1 bg-red-500 text-white rounded”>Remove</button>
</td>
</tr>
</tbody>
</table>
<div class=”text-center mt-4″>
<button class=”px-4 py-2 bg-blue-500 text-white rounded” onclick=”addPlayer()”>Add Player</button>
</div>
<div class=”text-center mt-6″>
<button class=”px-6 py-2 bg-green-500 text-white rounded-lg”>Continue</button>
</div>
</div><!– Step 3: Upload Selected Design –>
<div class=”max-w-4xl mx-auto bg-white p-6 rounded-lg shadow-md mt-10″>
<h2 class=”text-2xl font-semibold text-center mb-4″>Upload Selected Design</h2>
<div class=”space-y-4″>
<div>
<label class=”block text-lg font-medium”>Front Design</label>
<input type=”file” class=”w-full border p-2 rounded”>
</div>
<div>
<label class=”block text-lg font-medium”>Back Design</label>
<input type=”file” class=”w-full border p-2 rounded”>
</div>
<div>
<label class=”block text-lg font-medium”>Sleeves Design</label>
<input type=”file” class=”w-full border p-2 rounded”>
</div>
<div>
<label class=”block text-lg font-medium”>Shorts/Nicker Design</label>
<input type=”file” class=”w-full border p-2 rounded”>
</div>
</div>
<div class=”text-center mt-6″>
<button class=”px-6 py-2 bg-green-500 text-white rounded-lg”>Continue</button>
</div>
</div>
</body>
</html>
Seller Management UI/UX design Step 4: Select & Upload Logo
Upload logo for:
Preview of logos on design
Proceed to final review
Step 4: Select & Upload Logo
<!DOCTYPE html>
<html lang=”en”>
<head>
<meta charset=”UTF-8″>
<meta name=”viewport” content=”width=device-width, initial-scale=1.0″>
<title>Seller Management – Upload Logo</title>
<script src=”https://cdn.tailwindcss.com”></script>
</head>
<body class=”bg-gray-100 p-6″>
<div class=”max-w-3xl mx-auto bg-white p-6 rounded-lg shadow-md”>
<h2 class=”text-2xl font-semibold text-center mb-4″>Select Kit Type</h2>
<div class=”grid grid-cols-2 md:grid-cols-3 gap-4″>
<button class=”p-4 bg-blue-500 text-white rounded-lg”>Kabaddi Kit</button>
<button class=”p-4 bg-blue-500 text-white rounded-lg”>Cricket Kit</button>
<button class=”p-4 bg-blue-500 text-white rounded-lg”>Football Kit</button>
<button class=”p-4 bg-blue-500 text-white rounded-lg”>Kho-Kho Kit</button>
<button class=”p-4 bg-blue-500 text-white rounded-lg”>Jersey</button>
<button class=”p-4 bg-blue-500 text-white rounded-lg”>Tracksuit</button>
<button class=”p-4 bg-blue-500 text-white rounded-lg”>Lower</button>
<button class=”p-4 bg-blue-500 text-white rounded-lg”>Shorts/Nicker</button>
<button class=”p-4 bg-blue-500 text-white rounded-lg”>T-Shirt</button>
</div>
<div class=”text-center mt-6″>
<button class=”px-6 py-2 bg-green-500 text-white rounded-lg”>Continue</button>
</div>
</div><!– Step 2: Enter Player Details –>
<div class=”max-w-4xl mx-auto bg-white p-6 rounded-lg shadow-md mt-10″>
<h2 class=”text-2xl font-semibold text-center mb-4″>Enter Player Details</h2>
<table class=”w-full border-collapse border border-gray-300″>
<thead>
<tr class=”bg-gray-200″>
<th class=”border border-gray-300 px-4 py-2″>Player No.</th>
<th class=”border border-gray-300 px-4 py-2″>Name</th>
<th class=”border border-gray-300 px-4 py-2″>Size</th>
<th class=”border border-gray-300 px-4 py-2″>Number</th>
<th class=”border border-gray-300 px-4 py-2″>Team Name</th>
<th class=”border border-gray-300 px-4 py-2″>City/District/State</th>
<th class=”border border-gray-300 px-4 py-2″>Action</th>
</tr>
</thead>
<tbody id=”playerTable”>
<tr>
<td class=”border border-gray-300 px-4 py-2″>1</td>
<td class=”border border-gray-300 px-4 py-2″><input type=”text” class=”w-full p-1 border”></td>
<td class=”border border-gray-300 px-4 py-2″><input type=”number” class=”w-full p-1 border”></td>
<td class=”border border-gray-300 px-4 py-2″><input type=”text” class=”w-full p-1 border”></td>
<td class=”border border-gray-300 px-4 py-2 text-center”>
<button class=”px-2 py-1 bg-red-500 text-white rounded”>Remove</button>
</td>
</tr>
</tbody>
</table>
<div class=”text-center mt-4″>
<button class=”px-4 py-2 bg-blue-500 text-white rounded” onclick=”addPlayer()”>Add Player</button>
</div>
<div class=”text-center mt-6″>
<button class=”px-6 py-2 bg-green-500 text-white rounded-lg”>Continue</button>
</div>
</div><!– Step 4: Select & Upload Logo –>
<div class=”max-w-4xl mx-auto bg-white p-6 rounded-lg shadow-md mt-10″>
<h2 class=”text-2xl font-semibold text-center mb-4″>Upload Team & Sponsor Logos</h2>
<div class=”space-y-4″>
<div>
<label class=”block text-lg font-medium”>Team Logo</label>
<input type=”file” class=”w-full border p-2 rounded”>
</div>
<div>
<label class=”block text-lg font-medium”>Sponsor Logo</label>
<input type=”file” class=”w-full border p-2 rounded”>
</div>
</div>
<div class=”text-center mt-6″>
<button class=”px-6 py-2 bg-green-500 text-white rounded-lg”>Continue</button>
</div>
</div>
</body>
</html>
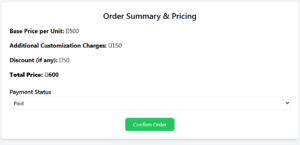
Seller Management UI/UX design Step 5: Finalize Order & Review Pricing
Base Price per unit
Additional Customization Charges
Discount (if any)
Total Price Calculation
Payment Status (Paid, Pending, Partially Paid)
Order Summary Confirmation
Step of Final Order
<!DOCTYPE html>
<html lang=”en”>
<head>
<meta charset=”UTF-8″>
<meta name=”viewport” content=”width=device-width, initial-scale=1.0″>
<title>Seller Management – Order Review</title>
<script src=”https://cdn.tailwindcss.com”></script>
</head>
<body class=”bg-gray-100 p-6″>
<div class=”max-w-3xl mx-auto bg-white p-6 rounded-lg shadow-md”>
<h2 class=”text-2xl font-semibold text-center mb-4″>Select Kit Type</h2>
<div class=”grid grid-cols-2 md:grid-cols-3 gap-4″>
<button class=”p-4 bg-blue-500 text-white rounded-lg”>Kabaddi Kit</button>
<button class=”p-4 bg-blue-500 text-white rounded-lg”>Cricket Kit</button>
<button class=”p-4 bg-blue-500 text-white rounded-lg”>Football Kit</button>
<button class=”p-4 bg-blue-500 text-white rounded-lg”>Kho-Kho Kit</button>
<button class=”p-4 bg-blue-500 text-white rounded-lg”>Jersey</button>
<button class=”p-4 bg-blue-500 text-white rounded-lg”>Tracksuit</button>
<button class=”p-4 bg-blue-500 text-white rounded-lg”>Lower</button>
<button class=”p-4 bg-blue-500 text-white rounded-lg”>Shorts/Nicker</button>
<button class=”p-4 bg-blue-500 text-white rounded-lg”>T-Shirt</button>
</div>
<div class=”text-center mt-6″>
<button class=”px-6 py-2 bg-green-500 text-white rounded-lg”>Continue</button>
</div>
</div><!– Step 5: Finalize Order & Review Pricing –>
<div class=”max-w-4xl mx-auto bg-white p-6 rounded-lg shadow-md mt-10″>
<h2 class=”text-2xl font-semibold text-center mb-4″>Order Summary & Pricing</h2>
<div class=”space-y-4″>
<p class=”text-lg”><strong>Base Price per Unit:</strong> ₹500</p>
<p class=”text-lg”><strong>Additional Customization Charges:</strong> ₹150</p>
<p class=”text-lg”><strong>Discount (if any):</strong> ₹50</p>
<p class=”text-lg font-bold”><strong>Total Price:</strong> ₹600</p>
</div>
<div class=”mt-6″>
<label class=”block text-lg font-medium”>Payment Status</label>
<select class=”w-full border p-2 rounded”>
<option value=”paid”>Paid</option>
<option value=”pending”>Pending</option>
<option value=”partially_paid”>Partially Paid</option>
</select>
</div>
<div class=”text-center mt-6″>
<button class=”px-6 py-2 bg-green-500 text-white rounded-lg”>Confirm Order</button>
</div>
</div>
</body>
</html>
Database Schema (Updated for Step-by-Step Implementation)
1. Orders Table
Column Name
Data Type
Description
order_id
INT (PK)
Unique Order ID
customer_name
VARCHAR(255)
Customer Name
order_date
DATETIME
Date & Time of Order
order_status
ENUM
Pending, In Progress, Completed, Cancelled
total_items
INT
Number of Items in Order
delivery_date
DATE
Expected Delivery Date
2. Order Customization Table
Column Name
Data Type
Description
customization_id
INT (PK)
Unique ID for Customization Entry
order_id
INT (FK)
Associated Order ID
dress_type
VARCHAR(100)
Type of Dress
design
VARCHAR(255)
Design Name
sleeve_color
VARCHAR(50)
Sleeve Color
back_color
VARCHAR(50)
Back Color
nicker_color
VARCHAR(50)
Nicker Color
rib_color
VARCHAR(50)
Rib Color
print_type
VARCHAR(100)
Screen Print/Digital Print/Embroidery
fabric_type
VARCHAR(100)
Cotton/Polyester/Dry Fit/Others
base_price
DECIMAL(10,2)
Base Price of Item
additional_price
DECIMAL(10,2)
Extra Charges for Customization
total_price
DECIMAL(10,2)
Final Price After Customization
3. Player/Team Details Table
Column Name
Data Type
Description
player_id
INT (PK)
Unique ID for Player
order_id
INT (FK)
Associated Order ID
name
VARCHAR(255)
Player Name
size
VARCHAR(5)
Size (S, M, L, XL, XXL)
number
INT
Jersey Number
team_name
VARCHAR(255)
Team Name
city
VARCHAR(100)
City Name
district
VARCHAR(100)
District Name
state
VARCHAR(100)
State Name
4. Design Upload Table
Column Name
Data Type
Description
design_id
INT (PK)
Unique Design ID
order_id
INT (FK)
Associated Order ID
front_design
VARCHAR(255)
Uploaded Front Design File Path
back_design
VARCHAR(255)
Uploaded Back Design File Path
sleeve_design
VARCHAR(255)
Uploaded Sleeve Design File Path
shorts_design
VARCHAR(255)
Uploaded Shorts/Nicker Design File Path
5. Logo Upload Table
Column Name
Data Type
Description
logo_id
INT (PK)
Unique Logo ID
order_id
INT (FK)
Associated Order ID
team_logo
VARCHAR(255)
Uploaded Team Logo File Path
sponsor_logo
VARCHAR(255)
Uploaded Sponsor Logo File Path
This updated UI/UX design and database schema ensures an easy step-by-step flow for sellers and customers while managing customized sportswear orders.